

Stepping up to a VPS (Virtual Private Server) is a major milestone for any website owner or developer, marking a transition from shared environments to more robust, isolated digital infrastructure.
Whether you are looking for a cheap Windows VPS server for remote work and specialized applications or a high-performance Ubuntu VPS server for web hosting and development, having your own dedicated resources offers unparalleled control, security, and scalability.
Unlike shared hosting, where resources are split among hundreds of users, a VPS ensures your applications have consistent access to CPU, RAM, and storage, resulting in faster load times and improved reliability.
Ready to take control of your hosting environment and experience the power of a cheap VPS server with dedicated virtual resources? Check out our high-performance VPS plans to get started with a reliable foundation today.
Choosing the Right VPS Provider
Selecting the best VPS server provider is the most critical decision for your project’s success. The physical location of your server directly impacts latency and user experience. To ensure peak performance, you need a provider that offers a strategic global footprint combined with high-tier infrastructure.
Global Reach with Gotmyhost
At Gotmyhost, we go beyond standard hosting. We operate our own dedicated Data Centers, giving us direct control over hardware, security, and network uptime. Whether your audience is local or global, we provide high-speed instances across the world’s most connected hubs:
- North America & Europe: For Western markets, choose the best VPS server USA or a secure VPS server Germany for high-performance hosting in the USA, Canada, Germany, Finland, and the UK.
- Asia-Pacific: For lightning-fast speeds in Asia, our VPS server Singapore and high-speed VPS server Australia offer the lowest latency for regional users.
The BDIX Advantage: Dominating the Bangladesh Market
If your primary audience is in Bangladesh, a standard international server isn’t enough. You need BDIX connectivity.
- Ultra-Low Latency: By routing traffic through the Bangladesh Inter-Internet Exchange (BDIX), users in Bangladesh experience response times as low as 1ms to 20ms.
- Local Bandwidth: Your website or application (like e-commerce or streaming sites) will load instantly for local users by bypassing congested international gateways.
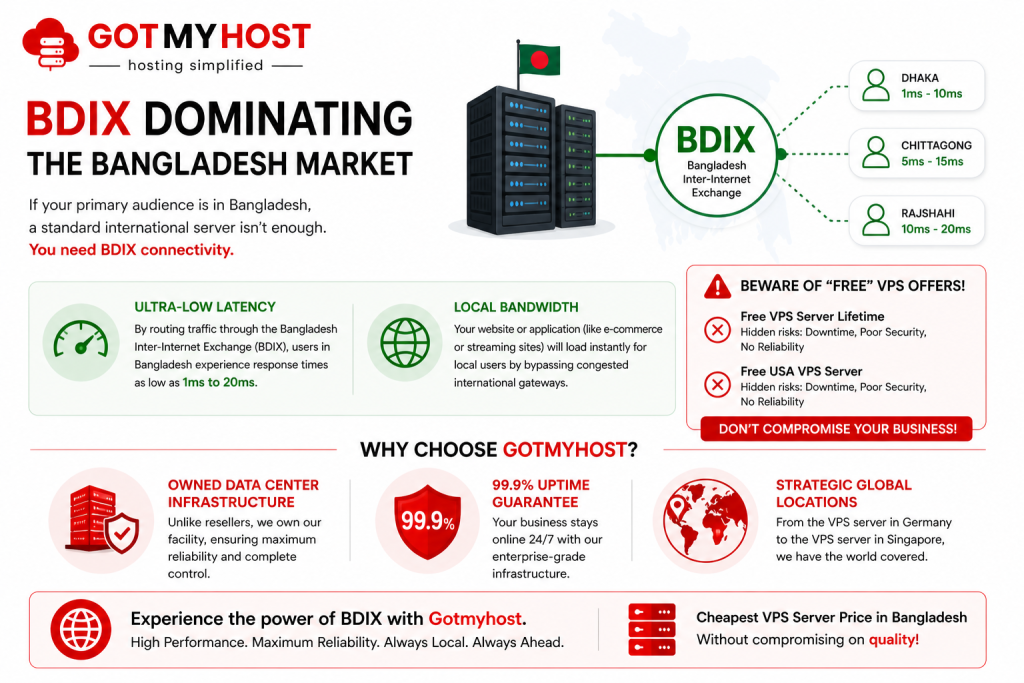
While you may encounter offers for a free VPS server lifetime or a free USA VPS server, these often come with hidden risks like downtime and poor security. At Gotmyhost, we offer a cheap VPS server price point without sacrificing enterprise-grade quality.
By choosing Gotmyhost, you benefit from:
- Owned Data Center Infrastructure: Unlike resellers, we own our facility, ensuring maximum reliability.
- 99.9% Uptime Guarantee: Your business stays online 24/7.
- Strategic Global Locations: From the VPS server in Germany to the VPS server in Singapore, we have the world covered.
Selecting Your Operating System
Selecting the appropriate Operating System is a pivotal step that should align with your specific technical objectives:
- Linux (Ubuntu/Debian/CentOS): The industry standard for web hosting. An Ubuntu VPS server is the premier choice for beginners, offering an extensive ecosystem of community support and documentation.
- Windows: Essential for environments requiring ASP.NET or specialized remote desktop applications. Look for a powerful VPS Server Windows or VPS Windows Server. While licensing costs make finding a free VPS Server Windows difficult, you can secure a cheap Windows VPS server to maintain your budget without compromising on functionality.
Getting Ready to Deploy Your VPS
Before we configure the VPS, make sure you have the following:
- A VPS running Ubuntu 24.04 LTS (or any recent Debian-based distribution). Most providers, including MassiveGRID, let you select your OS during provisioning.
- Your server’s IP address and root password (provided in your welcome email or control panel).
- A terminal application: Terminal on macOS/Linux, or Windows Terminal with OpenSSH (built into Windows 10+).
If you are getting those, now moving to the necessary step, what should you do after you receive your VPS?
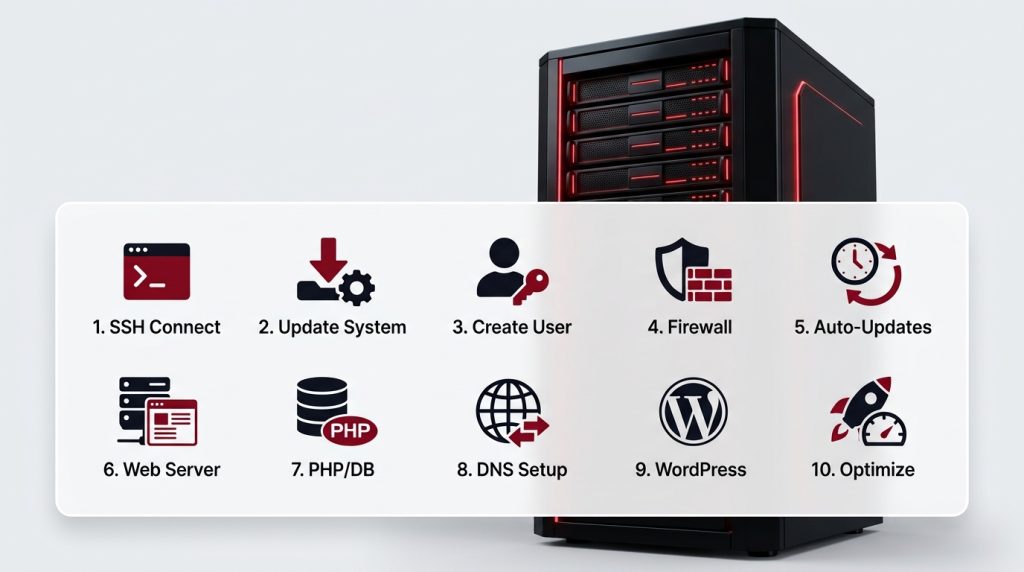
Step 1: Connect to Your VPS via SSH
SSH (Secure Shell) is the standard way to remotely manage Linux servers.
Mac/Linux users:
- Open Terminal
- Type the following command, replacing your-server-ip with your VPS IP address:
ssh root@your-server-ip- Press Enter. If it’s your first time connecting, type yes to confirm.
- When prompted, enter the root password from your welcome email.
Windows users:
- Open PuTTY.
- In the Host Name field, enter your VPS IP address.
- Set Port to 22.
- Click Open. A terminal window will appear.
- Enter root as the username.
- Enter the password from your welcome email (note: nothing will appear as you type — that’s normal).
Once logged in, you’re ready to configure your server.
Step 2: Update Your System
The first thing you should do on any fresh server is update all packages to their latest versions. This patch addresses known security vulnerabilities and ensures compatibility:
Open your terminal or PuTTY session and run:
apt update && apt upgrade -y

adduser yourusername

usermod -aG sudo yourusername
This command fetches the latest package lists (apt update) and then upgrades all installed packages (apt upgrade -y). The -y flag automatically confirms the upgrade. On a fresh server, this typically takes one to two minutes.
Step 3: Create A New User
Running everything as root is a security risk. If an attacker compromises your session, they have unrestricted access to your entire system. That’s why you need to create a regular user and grant it administrative privileges.
To disable root login, edit the SSF config file while being connected via SSH:
nano /etc/ssh/sshd_configLook for the line `PermitRootLogin` and change it to:
PermitRootLogin noSave and exit the file (in nano, press `CTRL + X`, then `Y`, then `Enter`), then restart SSH:
systemctl restart sshdFrom now on, use your new user for logging in.
Step 4: Configure the Firewall with UFW
UFW (Uncomplicated Firewall) is the simplest way to manage iptables rules on Ubuntu. Enable it and allow only the traffic you need:
# Allow SSH connections (critical - do this before enabling!)
sudo ufw allow OpenSSH

# Allow HTTP and HTTPS for web traffic
sudo ufw allow 80/tcp
sudo ufw allow 443/tcp

# Enable the firewall
sudo ufw enable

# Verify the rules
sudo ufw status verbose
You should see output confirming that ports 22, 80, and 443 are allowed, with all other incoming traffic denied by default. This alone blocks the vast majority of automated attacks targeting random ports.
Step 5: Enable Automatic Security Updates
Unpatched software is one of the most common attack vectors. Configure your server to automatically install security updates:
sudo apt install unattended-upgrades -y

sudo dpkg-reconfigure --priority=low unattended-upgrades
Select “Yes” when prompted. This enables automatic installation of security patches. Your server will check for updates daily and apply critical fixes without manual intervention.
Step 6: Install a Web Server (Apache or Nginx)
Most people set up a VPS to host websites or web applications. Apache is a highly flexible, module-based web server known for its power and ability to handle complex configurations on a per-directory basis using .htaccess files. Nginx is an event-driven, lightweight server designed for high concurrency and speed, making it the superior choice for serving static content and acting as a high-performance reverse proxy.
To install Nginx:
sudo apt install nginx -yTo Install Apache:
sudo apt install apache2 -yAfter installation, open your browser and navigate to http://YOUR_SERVER_IP. You should see the default welcome page. Your web server is running.
Step 7: Install PHP and Database (For WordPress or Web Apps)
For dynamic web applications, this step provisions the necessary runtime environment (PHP) and persistent data storage (MySQL/MariaDB), completing your server’s application stack.
To Install PHP:
sudo apt install php php-fpm php-mysql -yTo Install MySQL:
sudo apt install mysql-server -yStep 8: Connect Your Domain Name (DNS Setup)
To effectively bridge your custom domain with your virtual infrastructure, follow these streamlined steps to configure your DNS records:
- Access your administrative dashboard at your domain registrar.
- Navigate to the DNS Management or Zone Editor section.
- Provision a new “A” record that points specifically to your server’s unique IP address.
Example Configuration:
- Record Type: A
- Host/Name: @
- Points to: [Your VPS IP Address]
Allow approximately 5 to 30 minutes for DNS propagation across global gateways to complete.
Step 9: Install WordPress (Optional)
If you intend to host a WordPress site on your new virtual infrastructure, the deployment process involves several key technical maneuvers:
- Acquiring the latest WordPress core files
- Provisioning a dedicated MySQL or MariaDB database
- Configuring the wp-config.php file with secure credentials
- Uploading the application files directly to your server environment
For those seeking a more streamlined management experience, you can leverage robust control panels such as:
These administrative interfaces significantly simplify complex VPS management tasks, making them accessible even for beginners.
Step 10: Optimize Your VPS for Performance
To ensure your server achieves peak performance and lightning-fast response times, implement the following optimization strategies:
- Implement advanced caching mechanisms such as Redis and OPcache to reduce server load.
- Leverage a global Content Delivery Network (CDN) like Cloudflare to serve content from the edge.
- Fine-tune your PHP and MySQL configurations to align with your specific application requirements.
- Enable Gzip or Brotli compression to minimize data transfer sizes and accelerate page loading.
By executing these refinements, a properly optimized VPS can deliver speeds 3–10x faster than traditional shared hosting environments.
Quick Reference: Essential Commands
This curated collection of commands provides immediate, high-leverage access to crucial system operations. Utilize these essential terminal entries for swift server management, status checks, and fundamental maintenance tasks.
| Task | Commands |
| Update packages | sudo apt update && sudo apt upgrade -y |
| Restart a service | sudo systemctl restart nginx |
| Check service status | sudo systemctl status nginx |
| View firewall rules | sudo ufw status |
| Check disk space | df -h |
| Check memory | free -m |
| View recent logs | sudo journalctl -xe |
| Reboot the server | sudo reboot |
Common Mistakes to Avoid
Setting up a VPS can be tricky for beginners, and a single misstep in security or resource allocation can lead to performance bottlenecks or system vulnerabilities. To ensure your server remains robust and secure, it is essential to avoid frequent pitfalls such as neglecting regular updates or failing to configure a proper firewall.
- Operating as the root user: To mitigate security risks, always utilize a standard user account with sudo privileges for any administrative operations.
- Neglecting SSH access before enabling UFW: Failing to explicitly allow SSH traffic before activating your firewall will result in an immediate lockout from your virtual server.
- Overlooking SSH key authentication: Relying solely on passwords leaves your infrastructure susceptible to brute-force attacks. While Fail2ban offers a layer of protection, SSH keys represent the enterprise-grade solution for secure access.
- Ignoring package updates: Even with unattended-upgrades active, it is critical to periodically perform manual full upgrades to ensure non-security packages and system dependencies remain current.
- Failing to validate configuration changes: Always maintain an active, secondary SSH session when modifying network or firewall settings to ensure you have a fallback recovery path should a configuration error occur.
Read more: Where can I get a BDIX VPS server in Bangladesh?
Still Have Questions? Start Here
Get quick answers to the most common hurdles beginners face when launching their first server. This section helps you make informed decisions about your hosting environment.
What Is The Difference Between An Ubuntu VPS Server and a Windows VPS Server?
An Ubuntu VPS server is Linux-based, open-source, and ideal for developers who prefer command-line control and running web stacks (LAMP/LEMP). A VPS server Windows (or VPS Windows server) is better for those who need a GUI (Graphical User Interface) or need to run Microsoft-specific software like ASP.NET or MSSQL.
Can I Get a Free VPS Server for Lifetime?
While some providers offer a free VPS server lifetime or a free USA VPS server trial, these usually come with very limited resources and no support. For professional use or hosting sensitive data, it is much safer to invest in a cheap VPS server from a trusted provider like Gotmyhost to ensure security and 99.9% uptime.
Which Location Should I Choose: USA, Germany, Or Singapore?
Choose the location closest to your target audience. Use a VPS server in the USA for North American traffic, a VPS server in Germany for Europe, and a VPS server in Singapore or Australia for the Asia-Pacific region to minimize lag.
Does Gotmyhost Support BDIX For Users In Bangladesh?
Yes! Because we own our infrastructure, we offer optimized BDIX connectivity. This ensures that users in Bangladesh can access your VPS (Virtual Private Server) with ultra-low latency, making it the perfect choice for local e-commerce or media sites.
Why Should I Choose Gotmyhost Over Other Providers?
Unlike many hosts that simply rent space, Gotmyhost owns and operates its own Data Centers. This allows us to provide better security, direct hardware management, and highly competitive pricing on everything from a cheap Windows VPS server to high-performance Linux nodes in the USA, Singapore, Germany, Australia, and more.
Securing Your Future with Dedicated Resources
Mastering your own VPS (Virtual Private Server) is a transformative step for any growing project. While the initial setup requires a bit of learning, the benefits of total control, enhanced security, and dedicated performance far outweigh the learning curve. Whether you are deploying an Ubuntu VPS server for a high-traffic site or a cheap Windows VPS server for specialized applications, you now have the foundational knowledge to manage your environment like a pro.
Choosing the right partner is just as important as the setup itself. At Gotmyhost, we provide the stability of owned data centers and the versatility of global locations like the USA, Singapore, Germany, and Australia. Don’t settle for the limitations of shared hosting or the risks of a free VPS server lifetime offer that lacks support.
Stop compromising on speed and security. Deploy your high-performance VPS with Gotmyhost today and give your website the enterprise-grade home it deserves!