cPanel and WHM (Web Host Manager) are popular tools for web hosting providers and resellers. While cPanel is designed for end-users to manage their individual websites, WHM allows administrators and resellers to manage multiple cPanel accounts. If you’re new to WHM and need to create a cPanel account, this guide will walk you through the process step-by-step. Let’s get started.
Step 1: Log in to WHM
To create a cPanel account, you first need to log in to WHM. Follow these steps:
- Open your web browser.
- Navigate to your WHM login URL. This is typically
https://yourserverIP:2087orhttps://yourhostname:2087. - Enter your WHM username and password. These credentials are usually provided by your hosting provider.
- Click Log in.
Once logged in, you’ll be taken to the WHM dashboard.

Step 2: Access the Account Creation Tool
WHM provides a dedicated tool for creating cPanel accounts. To access it:
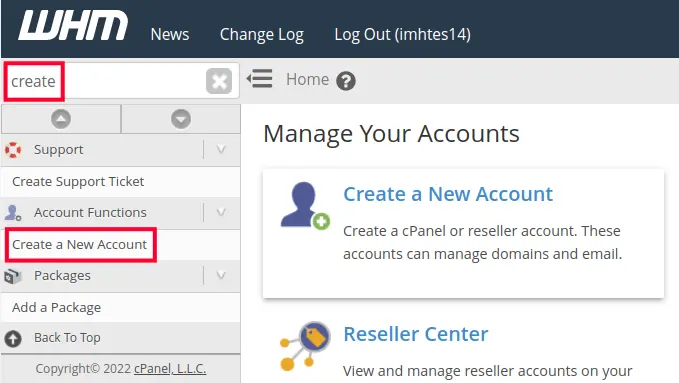
- From the WHM dashboard, locate the Account Functions section in the left-hand menu.
- Click on Create a New Account. This will open the account creation form.
Step 3: Fill Out the Account Information
You’ll now see a form with several fields that need to be filled out. Here’s what each field means:
1. Domain Information
- Domain: Enter the primary domain name for the new account (e.g.,
example.com). - Username: WHM will automatically suggest a username based on the domain name, but you can customize it. Make sure the username is unique and between 1-8 characters.
- Password: Create a strong password for the account. Use the password generator for added security.
- Email: Enter the account holder’s email address. This is important for account notifications and password recovery.
2. Package Settings
- Select a Package: If you’ve already created hosting packages in WHM, select the appropriate package for this account. Packages define resource limits like disk space, bandwidth, and email accounts.
- Manually Assign Resources: If you don’t want to use a package, you can manually set the resource limits. However, this is generally not recommended as packages help maintain consistency.
3. Settings
- CGI Access: Check this box if the user requires CGI access.
- cPanel Theme: Select a theme for the cPanel interface (e.g., Paper Lantern or Jupiter).
- Locale: Choose the language for the cPanel interface.
4. Reseller Settings
- If the account should have reseller privileges, check the Make the account a reseller box. Otherwise, leave it unchecked.
5. DNS Settings
- Enable DKIM and SPF: These are email authentication methods that help prevent spam and spoofing. It’s recommended to enable them.
- Use the nameservers specified at the domain’s registrar: Check this box if the domain’s nameservers are managed outside of your server.
6. Mail Routing Settings
- Choose the appropriate mail routing option for the account:
- Automatically Detect Configuration (default)
- Local Mail Exchanger
- Remote Mail Exchanger
- Backup Mail Exchanger
Step 4: Create the Account
Once all fields are filled out:
- Review the information to ensure accuracy.
- Click the Create button at the bottom of the form.
- WHM will process your request and create the cPanel account. This may take a few seconds.
When the account is successfully created, you’ll see a confirmation message along with details like the cPanel URL, username, and password.
Step 5: Verify the Account
To ensure the cPanel account was created successfully:
- Go to List Accounts under the Account Information section in WHM.
- Look for the new account in the list.
- Verify the account details, including the domain, username, and assigned resources.
Tips for Managing cPanel Accounts
- Backup Regularly: Encourage users to back up their websites. You can set up automated backups in WHM to simplify the process.
- Monitor Resource Usage: Use the WHM dashboard to monitor disk space, bandwidth, and other resources for each account.
- Secure Your Server: Implement security measures like firewalls, SSL certificates, and strong passwords to protect your accounts.
- Provide Documentation: Share guides and resources to help your users navigate their cPanel accounts effectively.
Conclusion
Creating a cPanel account in WHM is a straightforward process, but attention to detail is crucial. By following the steps outlined in this guide, you can ensure that your cPanel accounts are set up correctly and efficiently. Whether you’re a reseller or a hosting provider, mastering this process is an essential skill for managing multiple websites and users.
Take the time to familiarize yourself with WHM’s features, and you’ll be well-equipped to handle any hosting needs that come your way.


